Beginning with OpenGL in OCaml
Quick-Start examples in OCaml with OpenGL
Here are some examples, starting from the most simple,
that could maybe help you to begin with OpenGL in OCaml.
Warning: With OpenGL 3.X a deprecation model was introduced.
In the specifications it is explained as:
"OpenGL 3.0 introduces a deprecation model in which certain features may be
marked as deprecated. Deprecated features are expected to be completely
removed from a future version of OpenGL."
Most of this tutorial uses deprecated features. You can get "forward-compatible" examples
in the directory "TEST3" of the glMLite tarball.
Also please note that "foreward-compatible" examples are more complicated, so this
tutorial is still interesting for beginning, and then switch to an OpenGL 3.X
compatible model.
Introduction
OpenGL is a generic
real-time
3D library. Its rendering can be hardware accelerated when a driver is
installed for the graphics-card, or it can be software rendered with the
Mesa library. So OpenGL is
available in a wide range of environments.
The examples presented on this web-page use the OCaml-OpenGL interface
glMLite.
You can have an overview of the modules that it provides through this ocamldoc generated
documentation.
The GL module (the core OpenGL functions) provides links to the manual pages for each
functions of the OpenGL API.
All the scripts below can be executed with this command line:
ocaml -I +glMLite GL.cma Glut.cma demo.ml
Or alternatly you can add the following instructions at the very beginning of your files:
    #!/usr/bin/env ocaml

    #directory "+glMLite/"

    #load "GL.cma"

    #load "Glut.cma"
Or if you prefer to compile to binary native code for the best performances,
use this command:
ocamlopt -I +glMLite GL.cmxa Glut.cmxa demo.ml -o demo.exe
(for Linux and MacOSX, the file extension .opt will be prefered over the MS one .exe)
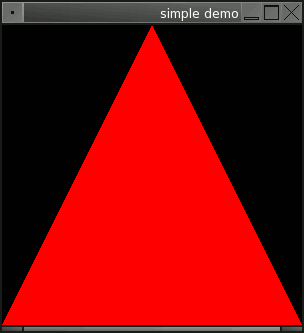
Now let's have a look at the first example. Here is below a line-by-line explanation of it.
The first thing calling glutInit
 with
with Sys.argv as parameter, will initialise the Glut library.
If the Sys.argv array contains parameters specific to OpenGL/Glut,
those parameters will be strip in the array returned by this function. This way
your application can parse this returned array without seeing the OpenGL parameters.
Then the window is created with glutCreateWindow
,
the parameter is the title which will appear in the handle of the window.
It returns the ID of the created window, but here we can just ignore it.
As OpenGL is a graphics rendering library, we need to define a rendering callback
which will be called each time a new frame will be drawn.
Register this callback with glutDisplayFunc
.
(We will examine the contents of the display callback later.)
Now the function glutMainLoop
will make the program enter in the main execution loop.
Depending on the Glut implementation you'r using this function never returns (in this
case exit the program with the exit function) or with more recent Glut this main loop
can be leaved with glutLeaveMainLoop.
(You can have more details about the Glut interface
from there.)
Now Let's have a description of the display callback.
The first function clears the content of the window (the previous drawn frame), otherwise
the primitives are drawn above the previous drawn frame. This won't have any important
effect in this first example because the image is fix, but you will see the difference
in the next example if you remove this command.
Then an RGB color is defined with glColor3 with 3 floats that have to lie in the range
between 0.0 and 1.0. Here the color defined is the red, so all the primitives that will
follow will be drawn in this color, until the next call to glColor.
If no color is define, the default one is the white (the default background color is black.)
Then the glBegin
function announces that we will define a triangle.
So a triangle will be defined untill glEnd which tells that the primitive is ended.
Between these 2 functions have to lie at least three points which are defined with
glVertex2
.
It is possible to give more than one triangle between glBegin and glEnd, in which case to define
N triangles, you have to provide (N * 3) vertices.
open GL
open Glut

let display () =
  glClear [GL_COLOR_BUFFER_BIT];
  glColor3 ~r:1.0 ~g:0. ~b:0.;
  glBegin GL_TRIANGLES;
    glVertex2 (-1.0) (-1.0);
    glVertex2 ( 0.0) ( 1.0);
    glVertex2 ( 1.0) (-1.0);
  glEnd ();
  glFlush ();
;;

let () =
  ignore(glutInit Sys.argv);
  glutInitDisplayMode [GLUT_SINGLE];
  ignore(glutCreateWindow ~title:"simple demo");
  glutDisplayFunc ~display;
  glutMainLoop ();
;;
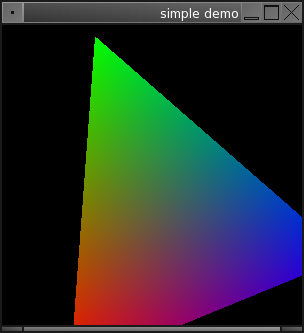
Here is what this script will output:
The First Animation
This second script is very close to the first one, with some modification
to make a very basic animation.
To make the animation fluid, the selected drawing mode with
glutInitDisplayMode
is the double buffered display, which means that there are two images to process
the rendering. One is displayed on the foreground of the drawing area, and
a second one lies in the background and this is this last one that is used by
drawing functions to draw the rendering, and this rendering is finished
the background buffer is swaped with the foreground buffer with the function
glutSwapBuffers which is called at the end of the display
callback. (If you use another windowing library than Glut, you will still find
equivalents to these functions that you will have to use to get a similar effect.)
An Idle callback is also defined. It is a function which is called when the computer
has temporarily nothing to do. This is often usefull while OpenGL programs are often
hard resource consumers. Here the Idle will call
glutPostRedisplay
which is a function that will request a new frame redraw at the end of the current
function.
A rotation is defined with glRotate
based on the
Sys.time.
function.
Another difference is a definition of a new color before each point, which
will produce a face filled as a gradient with three colors, from one at each point.
You can see the output on the image after the script source:
open GL
open Glut

let display () =
  glClear [GL_COLOR_BUFFER_BIT];
  glRotate ~angle:(Sys.time() *. 0.2) ~x:0.0 ~y:0.0 ~z:1.0;
  glBegin GL_TRIANGLES;
  glColor3 ~r:1.0 ~g:0.0 ~b:0.0;  glVertex2 (-1.0) (-1.0);
  glColor3 ~r:0.0 ~g:1.0 ~b:0.0;  glVertex2 ( 0.0) ( 1.0);
  glColor3 ~r:0.0 ~g:0.0 ~b:1.0;  glVertex2 ( 1.0) (-1.0);
  glEnd ();
  glutSwapBuffers ();
;;

let () =
  ignore(glutInit Sys.argv);
  glutInitDisplayMode [GLUT_DOUBLE];
  ignore(glutCreateWindow ~title:"simple demo");
  glutDisplayFunc ~display;
  glutIdleFunc ~idle:(glutPostRedisplay);
  glutMainLoop ();
;;
The Interaction Callbacks
Here are the callback functions that allow the handling of the interactions with the
keyboard and the mouse:
open GL
open Glut

(* mouse coordinates *)
let xold = ref 0
let yold = ref 0

let b_down = ref false

let angley = ref 0
let anglex = ref 0

let display () =
  glClear [GL_COLOR_BUFFER_BIT];
  glLoadIdentity ();
  glRotate ~angle:(float(- !angley)) ~x:1.0 ~y:0.0 ~z:0.0;
  glRotate ~angle:(float(- !anglex)) ~x:0.0 ~y:1.0 ~z:0.0;
  glColor3 ~r:0. ~g:1.0 ~b:0.;
  glutWireCube ~size:1.0;
  glFlush ();
  glutSwapBuffers ();
;;

(* active mouse motion *)
let motion ~x ~y =
  if !b_down then  (* if the left button is down *)
  begin
 (* change the rotation angles according to the last position
    of the mouse and the new one *)
    anglex := !anglex + (!xold - x);
    angley := !angley + (!yold - y);
    glutPostRedisplay();
  end;
  xold := x;  (* save mouse position *)
  yold := y;
;;

(* mouse button event *)
let mouse ~button ~state ~x ~y =
  match button, state with
  (* if we press the left button *)
  | GLUT_LEFT_BUTTON, GLUT_DOWN ->
      b_down := true;
      xold := x;  (* save mouse position *)
      yold := y;
  (* if we release the left button *)
  | GLUT_LEFT_BUTTON, GLUT_UP ->
      b_down := false;
  | _ -> ()
;;

let keyboard ~key ~x ~y =
  match key with
  | '\027' (* escape key *)
  | 'q' -> exit 0
  | _ -> ()
;;

let () =
  ignore(glutInit Sys.argv);
  glutInitDisplayMode [GLUT_DOUBLE];
  ignore(glutCreateWindow ~title:Sys.argv.(0));
  glutDisplayFunc ~display;
  glutKeyboardFunc ~keyboard;
  glutMouseFunc ~mouse;
  glutMotionFunc ~motion;
  glutMainLoop ();
;;
(use the mouse to make rotate the cube)
The GLU Library
The GLU library provides utility functions that are often usefull.
Those functions don't really provide new functionalities because
all the functions of the GLU library are defined with OpenGL functions.
See the ocamldoc of the
Glu module
#load "Glu.cma"
open Glu
Reshape the Window
If the window is not in fullscreen, it may happen that the user reshape the
window. In this case the projection matrix have to be readapted to the new
dimensions of the window, and also to its eventualy new aspect ratio.
To fix all this we use a reshape callback where the
new projection parameters will be set:
let reshape ~width:w ~height:h =

  (* set viewport to be the entire window *)
  glViewport 0 0 w h;

  (* aspect ratio of the window *)
  let aspect = (float w) /. (float h) in

  (* load the projection matrix to be modified *)
  glMatrixMode GL_PROJECTION;

  (* reinitialise the projection matrix (to the identity matrix) *)
  glLoadIdentity ();

  (* set the projection matrix,
     in other words: define the perspective view *)
  gluPerspective ~fovy:60.0 ~aspect ~zNear:0.5 ~zFar:80.0;

  (* switch to modelview matrix in order to set scene *)
  glMatrixMode GL_MODELVIEW;
;;
The fovy argument is very simple, it is the "Field Of View", in other words
the angle of the viewable area. The additional "Y" letter is because this angle is between
the left and the right, so along the vertical Y axis.
High values for fovy will increase the perspective feeling, but too high values won't be
realistic anymore.
Common values for fovy are between 45 and 60 degrees.
The zNear and zFar arguments are quite important,
they define the range along the Z axis (the axis of the look) between which the object
will be visible. So it's a common arror while beginning with OpenGL to put wrong values
and encounter problems with object that are not visible.
But the trick is also not to put a too wide interval because this would reduce the
precision of the display of the depth in the image, in particular for object that
are very close and intersecting.
You can get more explanations about this in the Wikipedia article about the
depth buffer.
The smaller is the range between zNear and zFar, the more precise will be the display
of the depth,
So try to define these parameters to fit properly the dimensions of the elements that
are drawn in the 3D scene.
The reshape callback will be called a first time during the initialisation,
so before the first frame rendering.
glutReshapeFunc ~reshape;
Unproject
Here is an example demonstrating how to transform the mouse 2D coordinates from the window area
to 3D coordinates usable in the 3D scene:
open GL
open Glu
open Glut

(* position of the mouse pointer *)
let px = ref 0.0
let py = ref 0.0

(* try to force refresh every "min_refresh" milliseconds *)
let min_refresh = 30

(* coordinate bounds of the window *)
let x_min = -6.0 and x_max = 6.0
and y_min = -6.0 and y_max = 6.0
and z_min, z_max = -6.0, 60.0 ;;

(* left button down *)
let ldown = ref false


let display () =
  glClear [GL_COLOR_BUFFER_BIT];
  glLoadIdentity ();

  glPointSize 5.0;
  glBegin GL_POINTS;

  if !ldown
  then glColor3 1.0 0.0 0.0
  else glColor3 1.0 1.0 0.0;

  (* just display the mouse pointer *)
  glVertex2 !px !py;

  glEnd ();

  glFlush ();
  glutSwapBuffers ();
;;


(* convert the coordinates of the mouse
   from window coordinates to the local
   representation *)
let reg_unproject_coords ~x ~y =
  let mx, my, _ = gluUnProjectUtil ~x ~y in
  px := mx;
  py := my;
;;

(* active mouse motion *)
let motion ~x ~y =
  reg_unproject_coords ~x ~y;
;;

(* passive mouse motion *)
let passive ~x ~y =
  reg_unproject_coords ~x ~y;
;;

(* mouse button event *)
let mouse ~button ~state ~x ~y =
  reg_unproject_coords ~x ~y;
  match button, state with
  | GLUT_LEFT_BUTTON, GLUT_DOWN -> ldown := true;
  | GLUT_LEFT_BUTTON, GLUT_UP -> ldown := false;
  | _ -> ()
;;

let keyboard ~key ~x ~y =
  match key with
  | 'q' | '\027' -> exit 0
  | _ -> ()
;;

let reshape ~width:w ~height:h =
  glViewport 0 0 w h;
  glMatrixMode GL_PROJECTION;
  glLoadIdentity ();
  if w <= h then
    glOrtho x_min x_max (y_min *. float h /. float w)
                        (y_max *. float h /. float w) z_min z_max
  else
    glOrtho (x_min *. float w /. float h)
            (x_max *. float w /. float h) y_min y_max z_min z_max;

  glMatrixMode GL_MODELVIEW;
  glLoadIdentity ();
;;

let idle () =
  glutPostRedisplay ();
;;

let gl_init () =
  glClearColor 0.5 0.5 0.5  0.0;
  glShadeModel GL_FLAT;
;;

let () =
  ignore(glutInit Sys.argv);
  glutInitDisplayMode [GLUT_DOUBLE; GLUT_RGB];
  glutInitWindowSize 600 600;
  glutInitWindowPosition 100 100;
  ignore(glutCreateWindow Sys.argv.(0));
  glutSetCursor GLUT_CURSOR_NONE;

  gl_init ();

  glutDisplayFunc ~display;
  glutReshapeFunc ~reshape;
  glutIdleFunc ~idle;
  glutMouseFunc ~mouse;
  glutKeyboardFunc ~keyboard;
  glutMotionFunc ~motion;
  glutPassiveMotionFunc ~passive;

  glutMainLoop ();
;;
Going Further
So this was a quite short introduction of OpenGL in OCaml, but OpenGL is not that
hard because it is a purely descriptive language.
For further going you will find a lot of tutorials around. But you have to know
that the reference documentation is the
Red-Book.
And you will find a lot of the examples of the Red-Book converted to OCaml in
the archive of glMLite,
in the directory named RedBook-Samples/.
GNU/FDL
© 2007 2008 Florent Monnier
Copying
This document is provided along the
FDL license,
which means that you can copy it with or without modifications and provide it
to who you want, as long as you do this in respect to the license.
You are also invited to send me an email to tell me what you thought of this document
Alternatively, you may also use this document under
CC-by-sa license
(any version).
Camelly Yours!