Introduction
First, MSL is an acronym which stands for Magick Scripting Language. The MSL language is a scripting language for ImageMagick and is formated in XML. It's made to be independent from any programing language (like C, Perl or PHP) and its associated ImageMagick API (like respectively the MagickCore, PerlMagick or php_imagick).
Conjure
MSL scripts are interpreted by an interpreter called conjure. This MSL HOWTO doesn't document the original ImageMagick conjure but an experimental one ml-conjure.
Quick-Start
OK, let's start with a simple exemple:
<?xml version="1.0" ?>
<msl>
  <image>
    <read filename='image.png' />
    <display />
  </image>
</msl>
The first line shows that we are in an XML document, the root tag indicates that we are in an MSL area. Then we declare an 'image' tag where we read an image from the disk, and display it.
Just execute this script with the interpreter compiled or not with either:
./conjure.ml incantation.msl
ml-conjure incantation.msl
It's of course possible to apply operations on the image, let's try to negate it:
<?xml version="1.0" ?>
<msl>
  <image>
    <read filename='image.png' />
    <negate />
    <display />
  </image>
</msl>
Multi-layer Compositing
It's possible to compose an image from several layers
(just like in the image manipulation programs with graphical user interface).
Just make a list of layers and request for merging these by putting this list inside a 'merge' tag.
<?xml version="1.0" ?>
<msl>
  <image>
    <merge>
      <layer compose='lighten'>
        <read filename='image.png' />
        <negate />
        <modulate hue='160' />
      </layer>
      <layer>
        <read filename='image.png' />
        <blur sigma='6' />
      </layer>
    </merge>
    <display />
  </image>
</msl>
(For IM users there's an alias for 'merge': you can use 'composite' instead.)
Layers Anatomy
Layers are merged/composited according to their compose attribute. The layer which is at the bottom in the list is the background, so it doesn't need a compose attribute (but if you put one, it will just be ignored).
Inside the 'layer' tag, the first element have to be a primitive. This primitive can be one of those:
    <read filename='image.png' />
    <make from='plasma:fractal' width='400' height='300' />
    <canvas color='#FFAA66' width='400' height='300' />
The result of a composite operation can also be used as a primitive.
After the primitive, you can put filter tags which will be applied on the primitive. The list of the filters are at the end of this page.
Appending Layers
As in the other ImageMagick interfaces it's possible to append layers:
<?xml version="1.0" ?>
<msl>
  <image>

    <append>
      <layer>
        <canvas width='50' height='50' color='#D33' />
      </layer>

      <layer>
        <canvas width='50' height='50' color='#5A0' />
      </layer>

      <layer>
        <canvas width='50' height='50' color='#29D' />
      </layer>
    </append>

    <display />
  </image>
</msl>

By default it appends the layers stack in the left to right direction.
To append top to bottom, add the 'stack' attribute in the append tag:
<append stack='top-to-bottom'>
Variables
Variables are used this way %[VAR], just set its value with the 'set' tag:
<?xml version="1.0" ?>
<msl>
  <set var='WIDTH'  value='300' />
  <set var='HEIGHT' value='200' />

  <image>
    <canvas width='%[WIDTH]' height='%[HEIGHT]' color='#D40' />
    <display />
  </image>
</msl>
Variables can be modified with mathematic operators:
<?xml version="1.0" ?>
<msl>
  <set var='WIDTH'  value='300' />
  <set var='HEIGHT' value='200' />

  <image>
    <canvas width='%[WIDTH]' height='%[HEIGHT]' color='#D40' />
    <display />
  </image>

  <set var='WIDTH'  op='/' value='3' />
  <set var='HEIGHT' op='/' value='2' />

  <image>
    <canvas width='%[WIDTH]' height='%[HEIGHT]' color='#D40' />
    <display />
  </image>
</msl>
Available operators are: '+', '-', '/', '*', '**', '^' and '%'.
Get Infos about the image
It is also possible to get informations about an image, and set it in a variable:
<?xml version="1.0" ?>
<msl>
  <set var='IMG_FILE' value='stone_moon.jpg' />
  <image>
    <read filename='%[IMG_FILE]' />

    <get width='W' height='H'
         depth='D' quality='Q' number_colors='NC' />

    <print output=' width x height: %[W] x %[H]' />
    <print output=' depth: %[D]' />
    <print output=' compression quality: %[Q]' />
    <print output=' number of colors: %[NC]' />
  </image>
</msl>
Switch structure
The switch statement is a control structure which provides the possibility to put a list of cases,
in which only one will be used.
The value given in the <switch> tag is compared to the value
given in each <case> tag,
and the content of the case which value is equal will be used in place of the <switch>.
<?xml version="1.0" ?>
<msl>
  <switch value='B'>

    <case value='A'>
      <print output='case A selected' />
    </case>

    <case value='B'>
      <print output='case B selected' />
    </case>

    <case value='C'>
      <print output='case C selected' />
    </case>

  </switch>
  <!-- This script will print "case B selected" -->
</msl>
When no equality is found between the switch value and any case value, then the script will stop and print a message to explain what happens. It is also possible to put a <default> tag, so if no case matches, the content of the default one will be used.
This structure is very handy to keep several alternatives in of the same script.
Here is a concrete exemple where several backgrounds can be selected with the %[SELECT]
variable:
<?xml version="1.0" ?>
<msl>
  <set var='WIDTH'  value='320' />
  <set var='HEIGHT' value='82' />
  <set var='SELECT' value='A' />

  <image>
    <merge>

      <layer compose='modulate'>
        <canvas width='%[WIDTH]' height='%[HEIGHT]' color='#FFF' />
        <draw_text x='22' y='66' text='SWITCH' point_size='72' />
        <blur sigma='2.6' />
        <shade azimuth='230' elevation='30' />
      </layer>

      <layer>
        <switch value='%[SELECT]'>
          <case value='A'>
            <canvas width='%[WIDTH]' height='%[HEIGHT]' color='#584' />
          </case>
          <case value='B'>
            <create width='%[WIDTH]' height='%[HEIGHT]' from='gradient:blue-white' />
          </case>
          <case value='C'>
            <create width='%[WIDTH]' height='%[HEIGHT]' from='plasma:fractal' />
            <modulate saturation='20' />
            <motion_blur sigma='6' />
          </case>
          <default>
            <create width='%[WIDTH]' height='%[HEIGHT]' from='pattern:checkerboard' />
          </default>
        </switch>
      </layer>

    </merge>
    <display />
    <write filename="switch-%[SELECT].png" />
  </image>

</msl>
Depending on the value the %[SELECT] variable is set with,
here are the results this script can produce:
- SELECT=A

- SELECT=B

- SELECT=C

- SELECT=Z

For structure
The for statement is a control structure which provides the possibility to
apply an iteration.
The iteration is exectuted with a variable over a given list.
<?xml version="1.0" ?>
<msl>

  <for var='MONTH' in='January February March April'>
    <print output='=> "%[MONTH]"' />
  </for>

</msl>
This exemple will print:
=> "January"=> "February"=> "March"=> "April"
So let's try to reproduce the previous exemple of the append operator:
<?xml version="1.0" ?>
<msl>
  <image>

    <append>
      <for var='COLOR' in='#D33  #5A0  #29D'>
        <layer>
          <canvas width='50' height='50' color='%[COLOR]' />
        </layer>
      </for>
    </append>

    <display />
  </image>
</msl>
IF condition
The if statement provides conditional branches selected from comparisons:
<?xml version="1.0" ?>
<msl>

  <if value='2' lower_than='4'>
    <then>
      <print output=' TRUE' />
    </then>
    <else>
      <print output=' FALSE' />
    </else>
  </if>
  <!-- produces TRUE -->
</msl>
There are 3 available comparisons, and it's possible to put several ones at the same time:
<?xml version="1.0" ?>
<msl>

  <if value='4' greater_than='2' lower_than='8' equal_with='4'>
    <then>
      <print output=' TRUE' />
    </then>
    <else>
      <print output=' FALSE' />
    </else>
  </if>
  <!-- produces TRUE -->
</msl>
id/idref
If there is the same layer used several times, instead of generating it each time, it is possible to create it once, then give an id to this layer, and it will be possible to use it as many time as you wish with taking it back with idref. In such case, you don't have to give a primitive as the first element inside the layer tag, since the referenced layer will be used instead.
<?xml version="1.0" ?>
<msl>

  <layer id='Base'>
    <canvas width='170' height='80' color='#FFF' />
    <draw_text x='25' y='60' text='MSL' point_size='45' stroke_color='#000' stroke_width='1.6' />
  </layer>

  <image>
    <merge>

      <layer compose='Multiply'  name='Shadow'>
        <merge>
          <layer compose='Lighten' idref='Base' />

          <layer idref='Base'>
            <blur sigma='2' />
            <modulate brightness='40' />
            <negate />
          </layer>
        </merge>
        <roll x='-2' y='-1' />
        <print output=' the shadow' />
        <display />
      </layer>

      <layer compose='Lighten'  name='Internal Light'>
        <merge>
          <layer compose='Multiply' idref='Base'>
            <negate />
          </layer>
          <layer>
            <canvas width='170' height='80' color='#2E2A3C' />
          </layer>
        </merge>
        <print output=' the light' />
        <display />
      </layer>

      <layer  name='Background'>
        <canvas width='170' height='80' color='#222' />
      </layer>

    </merge>
    <shear x='3' y='0' />
    <crop x='25' y='15' width='140' height='50' />

    <print output=' the result' />
    <display />
    <write filename='./code_tag.png' />
  </image>
</msl>
(The result of this script is the small background image in the upper right corner of the code areas.)
Exemple
Here is a quite consistent script exemple, with the image it creates:
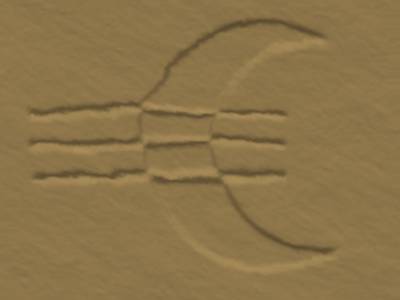
<?xml version="1.0" ?>
<msl>
  <set var='WIDTH'  value='400' />
  <set var='HEIGHT' value='300' />
  <set var='PAD'    value='6' />

  <set var='WIDTH'  op='+' value='%[PAD]' />
  <set var='HEIGHT' op='+' value='%[PAD]' />
  <image>
    <merge>
      <layer compose='displace'>
        <make from='plasma:fractal' width='%[WIDTH]' height='%[HEIGHT]' />
        <blur sigma='1.0' />
        <modulate brightness='90' saturation='90' />
      </layer>
      <layer compose='multiply'>
        <merge>
          <layer compose='difference'>
            <canvas color='#FFF' width='%[WIDTH]' height='%[HEIGHT]' />
            <draw_circle x1='270' x2='390' y1='150' y2='150' fill_color='#000' />
            <draw_circle x1='320' x2='420' y1='150' y2='150' fill_color='#FFF' />
          </layer>
          <layer>
            <canvas color='#FFF' width='%[WIDTH]' height='%[HEIGHT]' />
            <draw_line x1='35' x2='290' y1='120' y2='120' fill_color='#000' stroke_width='5' />
            <draw_line x1='35' x2='290' y1='150' y2='150' fill_color='#000' stroke_width='5' />
            <draw_line x1='35' x2='290' y1='180' y2='180' fill_color='#000' stroke_width='5' />
          </layer>
        </merge>
        <display />
        <blur sigma='2.4' />
        <shade azimuth='270' elevation='60' />
      </layer>
      <layer compose='modulate'>
        <make from='plasma:fractal' width='%[WIDTH]' height='%[HEIGHT]' />
        <blur sigma='1.2' />
        <shade azimuth='270' elevation='30' />
        <contrast sharp='reduce' times='2' />
      </layer>
      <layer>
        <canvas color='#A48856' width='%[WIDTH]' height='%[HEIGHT]' />
      </layer>
    </merge>

    <set var='WIDTH'  op='-' value='%[PAD]' />
    <set var='HEIGHT' op='-' value='%[PAD]' />
    <crop x='%[PAD]' y='%[PAD]' width='%[WIDTH]' height='%[HEIGHT]' />
    <display />
    <set_compression quality='40' />
    <write filename='stone_moon.jpg' />
  </image>
</msl>
Operations list
  <display />
  <modulate brightness='80' saturation='120' hue='60' />
  <shade azimuth='60' elevation='30' />
  <charcoal radius='4' sigma='3' />
  <emboss radius='4' sigma='3' />
  <sharpen radius='6' sigma='4' />
  <blur radius='4' sigma='3' />
  <gaussian_blur radius='4' sigma='3' />
  <motion_blur radius='8' sigma='6' angle='30' />
  <radial_blur angle='16' />
  <radial_blur_channel channel='blue' angle='30' />
  <swirl degrees='120' />
  <edge radius='2' />
  <implode amount='0.6' />
  <contrast sharp='increase' />
  <reduce_noise radius='4' />
  <medianfilter radius='3' />
  <spread radius='1.2' />
  <oilpaint radius='3' />
  <unsharpmask radius='0.8' sigma='1.2' amount='1.0' threshold='0.05' />
  <sample width='80' height='80' />
  <scale width='80' height='80' />
  <thumbnail width='80' height='80' />
  <resize width='80' height='80' blur='0.8' filter='Lanczos' />
  <crop x='10' y='10' width='300' height='200' />
  <splice x='60' y='60' width='80' height='80' />
  <roll x='60' y='40' />
  <shear x='10' y='2' />
  <rotate degrees='8' />
  <wave amplitude='3' wave_length='30' />
  <minify />
  <magnify />
  <flip />
  <flop />
  <enhance />
  <despeckle />
  <normalize />
  <equalize />
  <strip />
  <ordered_dither />
  <negate />
  <negate channel="red" grayscale="false" />
  <cyclecolormap displace='10' />
  <solarize threshold='65400' />
  <black_threshold threshold='30000,10000,50000' />
  <white_threshold threshold='5%,40%,80%' />
  <level levels="10x90+2" />

  <!-- Draw Functions -->
  <draw_round_rectangle  x1='40' y1='20' x2='180' y2='120' wc='22' hc='16'
                          fill_color='#888'  stroke_color='#444'  stroke_width='2' />
  <draw_rectangle  x1='20' y1='20' x2='100' y2='80'
                          fill_color='#888'  stroke_color='#444'  stroke_width='2' />
  <draw_line  x1='10' y1='10' x2='200' y2='80'
                          fill_color='#F00'  stroke_color='#0F08' stroke_width='3' />
  <draw_circle  x1='100' y1='100' x2='100' y2='130'
                          fill_color='#00F'  stroke_color='#000'  stroke_width='2' />
  <draw_ellipse  cx='100' cy='80' rx='60' ry='30' a1='180' a2='0'
                          fill_color='#D60'  stroke_color='#000'  stroke_width='1' />
  <draw_text  text='ABCDEF' x='20' y='60' point_size='40' font='generic.ttf'
                          fill_color='#444'  stroke_color='#F60'  stroke_width='1' />
  <draw_path  path='M 30 120 C 80 20 80 100 120 130 C 160 150 180 60 160 40'
                          fill_color='#D607' stroke_color='#0008' stroke_width='2' />
If you wish to get the description of the filters and the parameters, as these are quite the same than in the other ImageMagick interfaces, and particularly than the OCaml binding, you can read its description here.
The arguments written in italic in this list are optional.
Miscelanous
ml-conjure can also read from the standard input:
cat incantation.msl | ml-conjure -